
How to setup Windows Nano Server
May 30, 2015
Small footprint Windows Server Images is not a myth anymore. Few weeks back Microsoft announced the availability of Windows Nano Server preview coming out as part of Windows Server 2016 Technical Preview 2.
Nano Server as they call at the moment is a re-engineered, small footprint, hosting oriented, command-line only, minimal install option for Windows Server specifically designed for hosting applications, services and routines in cloud and data-centers.
This one is specifically small in size and has only minimal required things to start with. I will walk you through setting up and installing Windows Nano Server in VM on Hyper-V
Note: This guide is tested, works and applies to Windows Server 2016 Technical Preview 2. This may or may not work for any other version / variants of Windows Server or Nano.
![]()
To obtain source image for Windows Nano Server you need to download latest build for Windows Server 2016 (current version is Technical Preview 2)
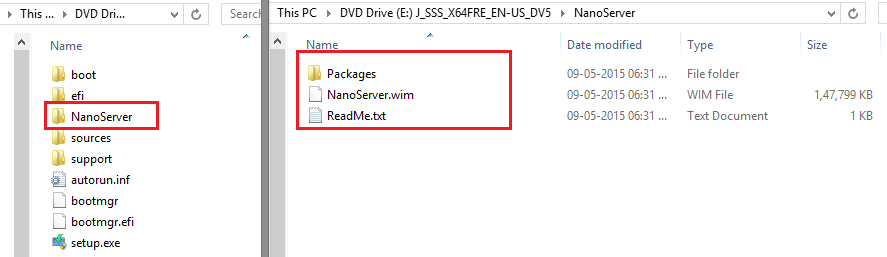
Windows Nano Server image *.wim can be found in a folder called NanoServer inside the Windows Server 2016 ISO on mounting.
IMP: Through the entire course we will be using Powershell (Run As Administrator) to execute commands and connect with the newly prepared and spinned Windows Nano Server. This preparation is done using Windows 8.1.
Step: Create a folder called nanoserver in C:\ or where you want. We will use this folder as our working folder to put all Nano Server related files and for preparation of Nano Server Virtual Hard Disk (VHD). For the sake of guide I am using C:\nanoserver as my working / preparation folder.
Step: Mount your Windows Server 2016 Technical Preview 2 ISO and copy contents from NanoServer folder to C:\nanoserver. You should be copying the NanoServer.wim image file and Packages folder to C:\nanoserver folder.
Same can be achieved in powershell using following command (E:\ is the letter of the drive where my Windows Server 2016 Technical Preview 2 ISO image is mounted):
Copy-Item E:\NanoServer\* C:\nanoserver -Recurse
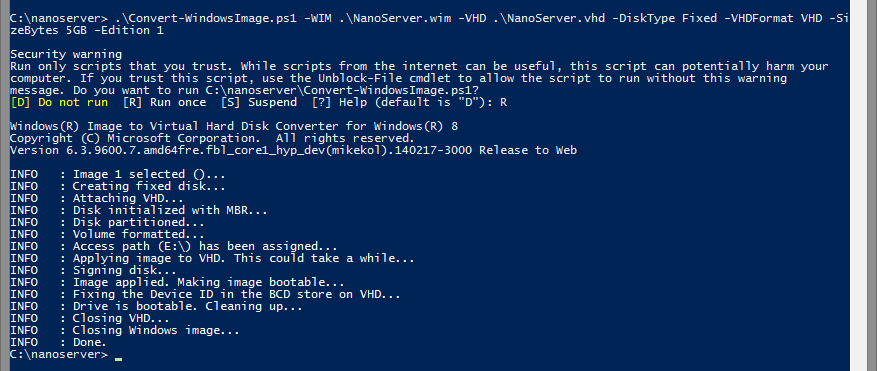
Step: Provided Nano Server image is of type *.wim - Windows Image and needs to be converted to *.vhd so we can create a VM in Microsoft Hyper-V using this *.vhd image.
To convert between images you require powershell script (Convert-WindowsImage.ps1) created by Pronichkin on Technet Script Center
Copy Convert-WindowsImage.ps1 to our setup folder C:\nanoserver
Step: Please make sure your Hyper-V is on or started. You can turn on and off your Hyper-V service using following command:
Turn on:
bcdedit /set hypervisorlaunchtype on (reboot required)
bcdedit /set hypervisorlaunchtype auto (reboot required)
Turn off:
bcdedit /set hypervisorlaunchtype off (reboot required)
Step: Convert-WindowsImage.ps1 script you just downloaded is unsigned, to execute this script without any issue you need to alter your script Execution-Policy in powershell (Input Y when asked for confirmation):
Set-ExecutionPolicy unrestricted
Step: Navigate to C:\nanoserver in your powershell prompt and execute following command to convert *.wim to *.vhd (Input R for Run once when asked for confirmation):
.\Convert-WindowsImage.ps1 -WIM .\NanoServer.wim -VHD .\NanoServer.vhd -DiskType Fixed -VHDFormat VHD -SizeBytes 5GB -Edition 1
It would take few minutes in conversion and will temporarily mount image as drive and will get removed by itself (ignore)
Note: Here -SizeBytes 5GB in switch in above command is the size of *.vhd you can change to the size you wish your Nano Server Hard Disk should have.
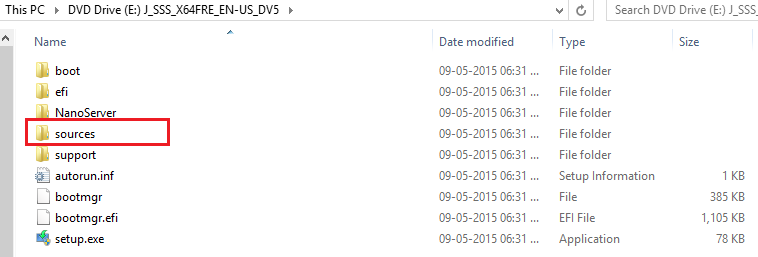
Step: Create a folder in C:\nanoserver folder called dism and copy following type of types from your mounted Windows Server 2016 Technical Preview 2 ISO > sources folder.
- api** downlevel **.dll
- ** dism **
- ** provider **
Step: Create a directory under C:\nanoserver called mountdir so that we can mount NanoServer.vhd into that directory.
md mountdir
Mount NanoServer.vhd using DISM.exe and add packages to VHD image.
dism /Mount-Image /ImageFile:.\NanoServer.vhd /Index:1 /MountDir:.\mountdir
Commands for adding packages:
dism\dism /Add-Package /PackagePath:.\packages\Microsoft-NanoServer-Compute-Package.cab /Image:.\mountdir
dism\dism /Add-Package /PackagePath:.\packages\Microsoft-NanoServer-FailoverCluster-Package.cab /Image:.\mountdir
dism\dism /Add-Package /PackagePath:.\packages\Microsoft-NanoServer-Guest-Package.cab /Image:.\mountdir
dism\dism /Add-Package /PackagePath:.\packages\Microsoft-NanoServer-OEM-Drivers-Package.cab /Image:.\mountdir
dism\dism /Add-Package /PackagePath:.\packages\Microsoft-NanoServer-Storage-Package.cab /Image:.\mountdir
dism\dism /Add-Package /PackagePath:.\packages\Microsoft-OneCore-ReverseForwarders-Package.cab /Image:.\mountdir
At this point you can unmount VHD and it would be ready to use and boot up.
Unmount VHD:
dism\dism /Unmount-Image /MountDir:.\MountDir /Commit
Default password on remote powershell connection authentication is blank space.
Step: You can create a file named unattend.xml and push to the VHD image where you can configure
Administratoruser's default password- Time-zone
- Computer Name
- Registered owner and organization name
for the Nano Server. There are many more things that can be specified in the unattend.xml file but that would be some basic things to control on first run.
An example unattend.xml file would be something similar to this one:
<?xml version='1.0' encoding='utf-8'?>
<unattend xmlns="urn:schemas-microsoft-com:unattend" xmlns:wcm="http://schemas.microsoft.com/WMIConfig/2002/State" xmlns:xsi="http://www.w3.org/2001/XMLSchema-instance">

  <settings pass="offlineServicing">
    <component name="Microsoft-Windows-Shell-Setup" processorArchitecture="amd64" publicKeyToken="31bf3856ad364e35" language="neutral" versionScope="nonSxS">
      <ComputerName>NanoServerComputerName</ComputerName>
    </component>
  </settings>

  <settings pass="oobeSystem">
    <component name="Microsoft-Windows-Shell-Setup" processorArchitecture="amd64" publicKeyToken="31bf3856ad364e35" language="neutral" versionScope="nonSxS">
      <UserAccounts>
        <AdministratorPassword>
           <Value>AdministratorUserPasswordGoesHere</Value>
           <PlainText>true</PlainText>
        </AdministratorPassword>
      </UserAccounts>
      <TimeZone>Pacific Standard Time</TimeZone>
    </component>
  </settings>

  <settings pass="specialize">
    <component name="Microsoft-Windows-Shell-Setup" processorArchitecture="amd64" publicKeyToken="31bf3856ad364e35" language="neutral" versionScope="nonSxS">
      <RegisteredOwner>OwnerNameGoesHere</RegisteredOwner>
      <RegisteredOrganization>OrganizationNameGoesHere</RegisteredOrganization>
    </component>
  </settings>
</unattend>
Create a file called unattend.xml in C:\nanoserver directory and execute following command to push unattend.xml file to your VHD image:
Mount VHD if not already mounted:
dism\dism /Mount-Image /ImageFile:.\NanoServer.vhd /Index:1 /MountDir:.\mountdir
dism\dism /image:.\mountdir /Apply-Unattend:.\unattend.xml
md .\mountdir\windows\panther
copy .\unattend.xml .\mountdir\windows\panther
Unmount VHD if you are done:
dism\dism /Unmount-Image /MountDir:.\mountdir /Commit
Step: you can additionally push a *.cmd file that will get executed after setup is complete on first run of Nano Server VM in Hyper-V.
Create a file called SetupComplete.cmd under C:\nanoserver, add ipconfig into it and save. This will print ipconfig command output on the VM blank screen once setup is complete on first run of Nano Server.
Mount VHD if not already mounted:
dism\dism /Mount-Image /ImageFile:.\NanoServer.vhd /Index:1 /MountDir:.\mountdir
md .\mountdir\Windows\Setup
md .\mountdir\Windows\Setup\Scripts
copy .\SetupComplete.cmd .\mountdir\Windows\Setup\Scripts
Unmount VHD:
dism\dism /Unmount-Image /MountDir:.\mountdir /Commit
At this point the VHD is ready to use and boot for first time. Open Hyper-V Manager and from top level menu > Action > New > Virtual Machine.
In New Virtual Machine Wizard > Connect Virtual Hard Disk step > selected "Use an existing virtual hard disk" and provide path to the NanoServer.vhd we prepared.
Nano Server on first boot started up and printed output of ipconfig in 18 seconds on my machine. That just blows my mind, cool stuffs.
You can connect to your up and running Nano Server using remote powershell:
Add Nano Server's IP address to list of trusted hosts on your machine before you can connect
Set-Item WSMan:\localhost\Client\TrustedHosts -Value <IPAddress-Of-You-NanoServer> -Concatenate
Input Y to confirm, two times.
Connect to Nano Server:
Enter-PSSession -ComputerName <IPAddress-Of-You-NanoServer> -Credential Administrator
Login prompt will popup asking for Administrator user's password.
I think there is no Microsoft .NET Framework that comes installed out-of-the-box (full .NET framework installation is not supported for Nano Server at the moment) but after some traversing I found a folder named CoreCLR under C:\Windows\System32 and it contains bunch of DLLs / libraries under folder named v1.0. Also tried dnx and dnvm but that didn't work so no .NET runtime environment tools installed already.
Tried installing DNX / DNVM tools using command provided at Github - ASP.NET Home Repo
But it seems that net.webclient class is missing for powershell to use:
`new-object : Cannot find type [net.webclient]: verify that the assembly containing this type is loaded.
At line:1 char:23
+ &{$Branch='dev';iex ((new-object net.webclient).DownloadString('https ...
+                       ~~~~~~~~~~~~~~~~~~~~~~~~
    + CategoryInfo          : InvalidType: (:) [New-Object], PSArgumentException
    + FullyQualifiedErrorId : TypeNotFound,Microsoft.PowerShell.Commands.NewObjectCommand
Comment below if you have more to add or update.