
Using a virtulization platform is a common thing these days, unless you still build things on your grandma's machine.
Cloud computing is application of this feature to bring unlimited options, power, scalability and flexibility to your business.
But we use virtulization for developement too, a lot I say. Few big guns that makes their way in your environment are:
I have been using Virtual Box since last 3 years now, everyday and it is open source and totally awesome, you won't regret.
Hyper-V is already there as a component in your Windows 8 or 2012 machine. I gave it a shot for few months but was disappointed by the limited support for virtualizing non-windows systems. I won't say it sucks but I expected a lot more. Best choice for virtualizing windows machines though.
VMWare is the paid virtualization solution and every penny spent is worth the product. I had evaluated this option long back and finally decided to stick with it now.
Using a virtualization platform bring a lot of advantages, now I am glad my host machine (Windows 8.1 Pro) is always clean and does not become victim of my random dirty reseaches, learning or evaluations. But in sometime I realized that I started spending unnecessary time in preparing VMs for those nasty things. Plus, it would take me few minutes to hours before I can start my actually work.
Vagrant is the answer to those problems.
Create and configure lightweight, reproducible, and portable development environments.
Thats what she said !!
It supports all the above three virtualization platform and download / installing / using vagrant is very simple thing.
you can literally get into action in two commands:
vagrant init
vagrant up
This will build-up and run a environment in minutes (only box download penalty for first time).
There is lot more to it beyond Init and Up. At time of this writing I am using Vagrant
vagrant version
"Installed version: 1.6.0"
Vagrant is a command-line utility on top of your virtualization to bring automation in workflow and actions.
Few terms you need to get used to:
-
Boxes - Its basically a zip file with
.boxextension that has a packed Virtual machine in it along with related files. This Virtual machine will be vendor specific based on your needs. Think of this boxes as template VM that will be used as the base to create your virtual machines. You can create your own new box or modify existing installed box as per your needs and pack it again to be used as template in your next Vagrant environment.You can access already created community boxes available for you to get started. Listed on Vagrant Cloud.
-
Providers - As already mentioned before, Vagrant runs on top of your existing Virtualization platform. So the provider are those platform. Providers are recognized in Vagrant by names. E.g. Vmware as 'vmware_fusion', VirtualBox as 'virtualbox'.
-
Provisioners - This is the way you can do actions, routines and setups. Provisions can be as simple as running command via Shell scripts or advance like using Puppet, Chef and Ansible.
So this would be the vagrant big picture (as I understand) once installed on your machine:
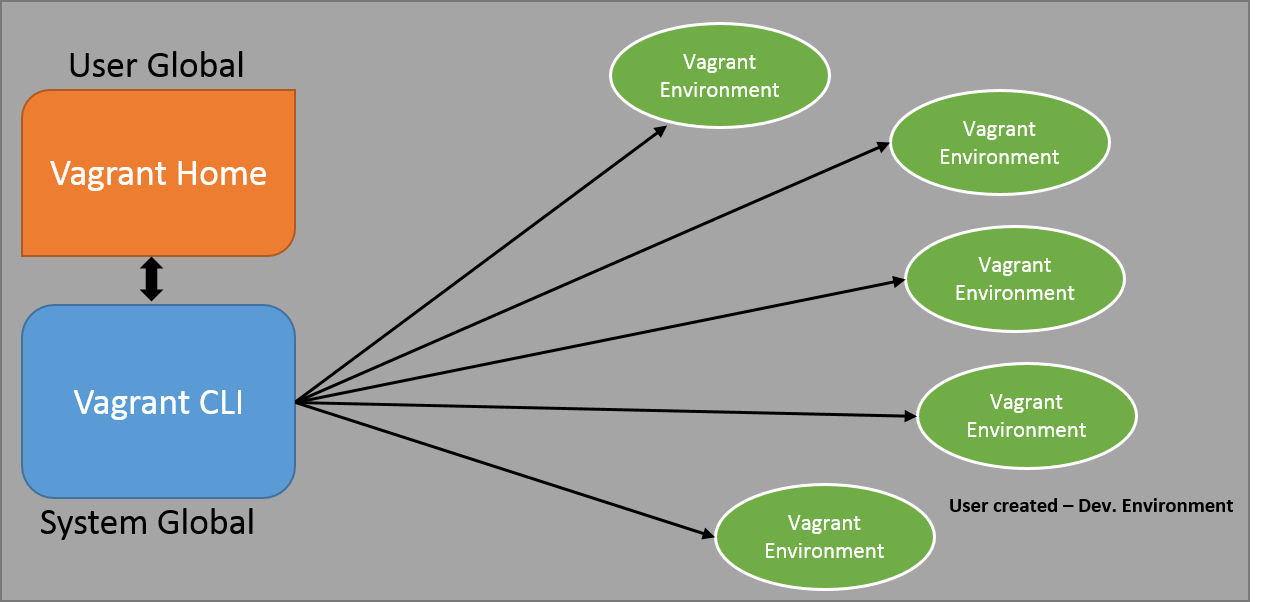
There are three main components you need to get used to with (official terminology may differ)
- Vagrant CLI
- Vagrant Home
- Vagrant Environment
Vagrant CLI
After you install Vagrant (with default options) you find a new directory in your system drive - C:/HashiCorp/Vagrant
This contains two sub-directories bin and embedded.
-
Bin directory contains the
Vagrant.exethat will used when you fire any commands against vagrant. -
Embedded directory contains the executables and GEMS (Ruby) that vagrant will use to entertain your commands.
This will be installed and can be used by "All Users" on the machine on which it is installed. During installation Vagrant installer will add the C:/HashiCorp/Vagrant/bin directory to your environment variable list. If not you can mannually add to your PATH variable.
You can access Vagrant via command prompt with Vagrant [options] command where options are listed when you fire Vagrant help
Vagrant Home
Vagrant home is a per user directory used by Vagrant to manage that user's data and activities.
By default you can find this directory automatically created (mostly at the first run of Vagrant on command prompt) at: C:/Users/<your-username>/.vagrant.d/
This directory contains various sub directories that manages your per-user data.
One sub-directory is boxes that will contain extracted version of VM boxes (the templates, I say) that you will use to create your VM and developement environment.
Vagrant Environment
Vagrant environment are your individual (one or more, independent) environments that will contain one or more VM your create from the above mentioned added VM boxes templates.
You can create as many environments you wish by executing following command:
vagrant init
Above command creates a new vagrant environment in the directory it is executed. This "Creating environment" is mostly creating a new Vagrant file in that directory that will be used by Vagrant to manage your environment.
The command will also create a .vagrant directory which will contain your machines as specified in the Vagrant file and other related files for this environment.
A typical empty vagrant file (when above command is executed) would look something like this:
# -*- mode: ruby -*-
# vi: set ft=ruby :

# Vagrantfile API/syntax version. Don't touch unless you know what you're doing!
VAGRANTFILE_API_VERSION = "2"

Vagrant.configure(VAGRANTFILE_API_VERSION) do |config|
  config.vm.box = "base"
end
You can provide [name] of the box to be used as base box (template) for your environment if desired and specify URL where the box can be found, this can be either a URL from where it can be downloaded or can be a file path (absolute or relative) where the .box file is stored. You can also specify box name that is hosted on VagrantCloud.
You can configure and manage your vagrant developement environment using this Vagrant file. Few of the options you can manage are hostname of a machine, memory size to use, number of cores to use, shared folder (or Synced folder), networks configurations etc.
Vagrant Enironment can be visualized as follow:
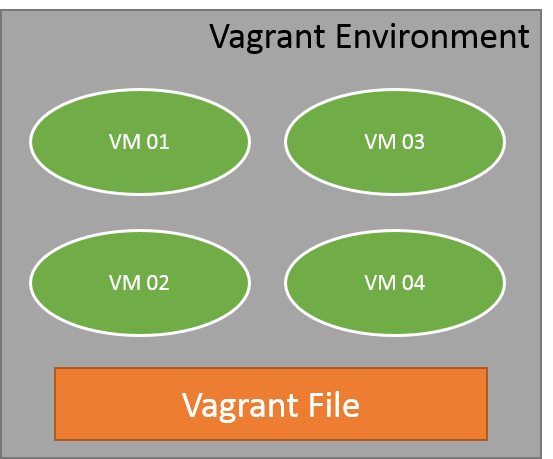
Here is an sample Vagrant file configuration which I can use to create two VM in a environment.
# -*- mode: ruby -*-
# vi: set ft=ruby :

VAGRANTFILE_API_VERSION = "2"
Vagrant.configure(VAGRANTFILE_API_VERSION) do |config|

  # Machine 01
  config.vm.define "hostone" do |hostone|
      # Base-box specifications.
      hostone.vm.box = "precise64"
      # Set VM's host name
      hostone.vm.hostname = "host01-precise"
      # Use bridged network
      hostone.vm.network :public_network
      # Synced folder
      hostone.vm.synced_folder "./vmshare", "/vmshare"
      #Use VmwareFusion provider and set memory and CPU.
      hostone.vm.provider "vmware_fusion" do |vmware|
        # Memory size
        vmware.vmx["memsize"] = "1024"
        # Number of virtual CPU to use
        vmware.vmx["numvcpus"] = "4"
    end
  end
  # Machine 02
  config.vm.define "hosttwo" do |hosttwo|
      # Base-box specifications.
      hosttwo.vm.box = "precise64"
      # Set VM's host name
      hosttwo.vm.hostname = "host02-precise"
      # Use bridged network
      hosttwo.vm.network :public_network
      # Synced folder
      hosttwo.vm.synced_folder "./vmshare", "/vmshare"
      #Use VmwareFusion provider and set memory and CPU.
      hosttwo.vm.provider "vmware_fusion" do |vmware|
        # Memory size
        vmware.vmx["memsize"] = "4096"
        # Number of virtual CPU to use
        vmware.vmx["numvcpus"] = "6"
    end
  end
end
Here you can see we have define two vm named "hostone" and "hosttwo" inside those block you can configure the VM.
On firing vagrant up or vagrant up [machine-name] (which can be hostone or hosttwo in above case) you will get the environment machines up and running.
You can access the machines by vagrant ssh or vagrant ssh [machine-name]
Output for my vagrant up based on above vagrant configuration
λ vagrant up
Bringing machine 'hostone' up with 'vmware_workstation' provider...
Bringing machine 'hosttwo' up with 'vmware_workstation' provider...
==> hostone: Cloning VMware VM: 'precise64'. This can take some time...
==> hostone: Verifying vmnet devices are healthy...
==> hostone: Preparing network adapters...
==> hostone: Starting the VMware VM...
==> hostone: Waiting for the VM to finish booting...
==> hostone: The machine is booted and ready!
==> hostone: Forwarding ports...
    hostone: -- 22 => 2222
==> hostone: Setting hostname...
==> hostone: Configuring network adapters within the VM...
==> hostone: Waiting for HGFS kernel module to load...
==> hostone: Enabling and configuring shared folders...
    hostone: -- C:/blog-test/vmshare: /vmshare
    hostone: -- C:/blog-test: /vagrant
==> hosttwo: Cloning VMware VM: 'precise64'. This can take some time...
==> hosttwo: Verifying vmnet devices are healthy...
==> hosttwo: Preparing network adapters...
==> hosttwo: Starting the VMware VM...
==> hosttwo: Waiting for the VM to finish booting...
==> hosttwo: The machine is booted and ready!
==> hosttwo: Forwarding ports...
    hosttwo: -- 22 => 2222
==> hosttwo: Setting hostname...
==> hosttwo: Configuring network adapters within the VM...
==> hosttwo: Waiting for HGFS kernel module to load...
==> hosttwo: Enabling and configuring shared folders...
    hosttwo: -- C:/blog-test/vmshare: /vmshare
    hosttwo: -- C:/blog-test: /vagrant