
THE IDEA
"God's Own Machine" - Always loved this term, not sure who coined it but read it first from Scott's Blog long back.
All right - back in Early 2014, I decided to create my own build (custom assembled desktop computer) and I came up with a build that I call "Triga". Follow the link for more details of it.
Three years later while using Triga day and night, I started feeling to do an upgrade and create a better build to keep up with the new tech / gadget's trend. Plus, this one was dying or lagging at times, especially when I try to work on Xamarin based stuffs.
I believe that it is worth spending money as a programmer if you can save time and be more productive in your work instead of waiting for couple of seconds to few minutes to see your code building or project opening / getting ready. Think of this, if you are working 8-12 hours a day and build 10 times (let per build time be 2 min) - you save 20 min or less every day to do something else or more. Moreover who likes to sit, wait and watch your screen while doing nothing / helplessly.
Two things triggered to finally build a new build:
- Nick Craver's post - Thanks for being open about it and SO code snaps on Twitter which I am big fan of.
- Big / fat reward (not mentioning excat amount) from a client (who remains anonymous) for which I did urgent hot updates / fixes in breaking production around payment workflow (This effort of sleepless nights, saved him huge money). Thank you Mr. Client.
So got some reference to start with from Nick and money to spend.
THE NAME
I call it THANOS. All comic fans would know it. No particular reason for naming it as such this time but recently binge watched all Marvel movies and waiting for him to be seen more in up-coming parts. Plus gives a nice edge to all the money spent and efforts put in. Please don't boo me!!
 Just referencing it, but I do not own copyright of this image and /or name.
I like this idea of naming builds, considering I will keep doing it in future.
THE BUILD
Detailed configuration of the build:
| Part - Description / Remarks |
|---|
|
Processor: Intel® Core™ i7-6900K Processor - Extreme Edition Series There is one higher version of this series 6950X but didn't noticed much upgrade power then the one I choose. Skylake 2011-v3, this one has 8 Core / 16 Threads - 20 MB Cache - Base clock 3.2GHz (overclockable - notice K in name) - DDR4 2400/2133 Mem Support with max 128 GB |
|
Motherboard: Asus X99 - Deluxe II This time I went with ASUS instead of Gigabyte. I must say very impressed with what ASUS is doing with MOBOs now. My requirement was simple - Should support 2011-v3 processor, DDR4 mems, M.2 Socket 3, lots of USB 3.0/+ ports and two LAN ports on board (don't wish to do dual LAN but I live in India so broadbands are worst, I use two connections). This one fits the need, plus it can overclock well and has great options to do so, I tend not to do that as base configs suffice my needs for most of the time. Note: It does not have any on-board traditional ports (HDMI, DP etc) for display output so getting a decent graphics card was mandatory. I like the idea, MOBO should do what it is made to do the best, let G Card worry about display and graphics. |
|
RAM / Memory module: VENGEANCE® LED 32GB (2 x 16GB) DDR4 DRAM 3200MHz C16 Memory Kit - White LED LED was optional on my requirement but got it anyways. 32 GB was enough for me ATM so went with 2x16GB kit (got 8 slots on MOBO), later will get another 32 GB kit and more if needed till I fill up 128 GB limit on this build. |
|
Graphics Card: ASUS GeForce® GTX 1070 Founders Edition Again being just a programmer my requirement was simple - should support 4 display. Currently have 3. This one has 3 DP port and one HDMI. 8GB mem (but lesser would do fine too). I first thought to go with 1080 GE but did not made much sense for such pricy choice (this one was not so cheap either :D). This one is monster size and very heavy, remember to get it only if you have a sturdy cabinet / tower and MOBO to hold it. |
|
Storage: SSD 960 PRO NVMe M.2 512GB I must say, an SSD on your build custom or pre-made makes a huge different. I have been waiting to get this long ago, finally have it. Perf. is mind blowing and simply love it. I too have 2 other SSD attached in build but this one was a good upgrade I think. |
|
CPU Cooler / Heat sink: Hydro Series™ H115i 280mm Extreme Performance Liquid CPU Cooler Wanted to be on safer side - caring for my CPU. Any normal sink should do the trick on base config and if you are not overclocking at all or much. But wanted to keep my options open. This one is big with 280mm radiator and 140mm Dual fans, choose this only if you have enough space in your cabinet / tower, almost fits in mine. Has thermal paste / layer pre-applied so you do not have to do the dirty work. |
|
Power Supply Unit: Cooler Master Vanguard 1000 Watts PSU Very important in any build, always have a good PSU which has enough power and necessary specs to run your board. I do not use all the power to max. it can offer but I kept spare in case I needed to add more parts to this build. This one is old but still does the trick and works great. |
|
Cabinet - chassis / Tower: Cooler Master - Strom Trooper (Full Tower)
I call it batman tower (blacky). Spacious, can accommodate XL-ATX / ATX or smaller MOBO with out any problems. Lots of room and angles to add HDD modules. Good exhaust openings, fan options. Has this concrete handle on top to carry or hold it properly. One side transparent window, which would give you opportunity to see through and show-off your fancy parts glowing in case. |
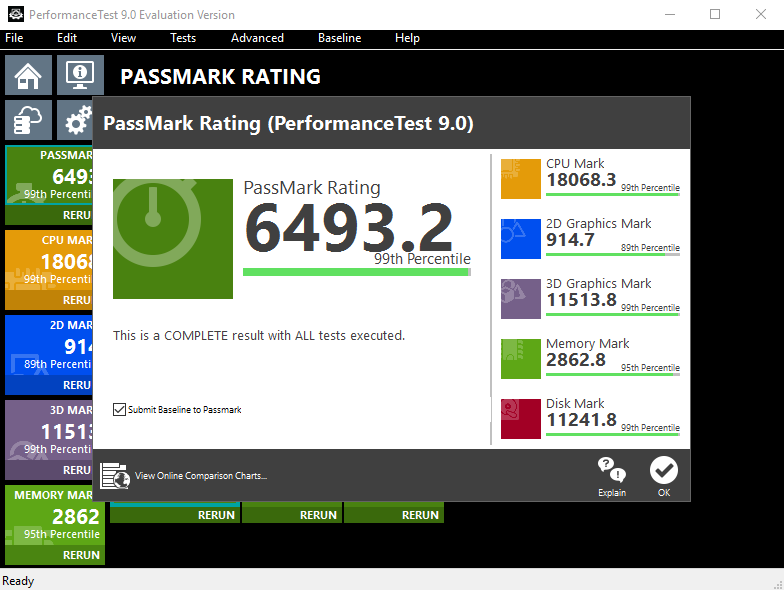
Benchmarks
Ran benchmark tests using Performance Test 9.0 (Evaluation) and here are my baseline results:
Final words: Glad I did it and happy with outcome. Now back to doing what I do, CODE.
Note: In case you follow the path, remember to research your build well. Read, google, ask and decide. There is so many things that affects what you assemble together. Compatibility is the key to what you can look forward to. Out of all other things that I did before deciding on this configuration, I also did a quick build on this site - PC Part Picker - this may help.
HAPPY CODING & BUILDING!!