
Shout out: WPF programmer, someday you will be asked to work on a feature where you need to show live preview of a attached USB camera (webcam) and on click of button you need to capture a picture and save or display in some image control.
Pretty simple right?
Well actually not, ok partially. Fine its pretty simple. Let me walk you through it and save you some time.
People who wants to jump right into the code refer / download attached sample at the end of this article. Best of luck !!
How to preview webcam (camera) video and take snapshot with WPF using AForge and MVVM.
Step:
Create a new WPF project or use your ongoing / existing WPF project, whatever you fancy.
Step:
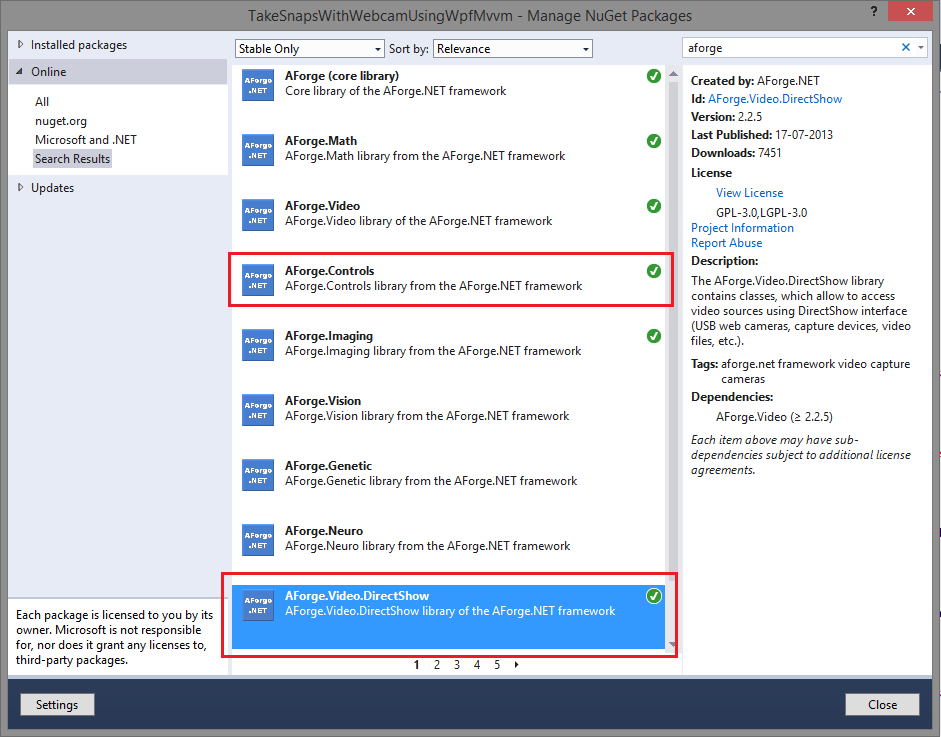
Add reference to AForge NuGet package that will do the "talking to the webcam" stuffs for us.
- AForge.Controls
- AForge.Video.DirectShow
By adding this two packages will automatically add dependent packages. Also add reference to MVVM Light toolkit (if you have created a new project).
Note: AForge is very mature and robust opensource library for audio / video processing / rendering and manipulation stuffs. Go for it thing and I am not affiliated with them by any means.
Shout out to Glenn Fransen (past colleague and ninga VC++ / Embedded developer) for AForge suggestion, thanks :)
Step: Next add reference to two assemblies System.Windows.Forms and WindowsFormsIntegration. This will be used to host the video preview for selected video device source.
Step: Create new WPF user control (XAML) file that will contain the video preview and conditionally display optional text / frame conveying user message like "No video source found" or something similar.
The XAML for this user control would be as below:
<UserControl x:Class="TakeSnapsWithWebcamUsingWpfMvvm.Video.WebcamDevice"
             xmlns="http://schemas.microsoft.com/winfx/2006/xaml/presentation"
             xmlns:x="http://schemas.microsoft.com/winfx/2006/xaml"
             xmlns:mc="http://schemas.openxmlformats.org/markup-compatibility/2006"
             xmlns:d="http://schemas.microsoft.com/expression/blend/2008"
             xmlns:controls="clr-namespace:AForge.Controls;assembly=AForge.Controls"
             mc:Ignorable="d"
             d:DesignHeight="300"
             d:DesignWidth="300"
             Loaded="WebcamDeviceOnLoaded"
             Unloaded="WebcamDeviceOnUnloaded">
    <Grid>
        <Grid x:Name="NoVideoSourceGrid"
              Margin="10">
            <Border BorderBrush="DimGray"
                    BorderThickness="1">
                <TextBlock x:Name="NoVideoSourceMessage"
                           VerticalAlignment="Center"
                           HorizontalAlignment="Center"
                           TextWrapping="Wrap"
                           FontSize="20"
                           FontWeight="Bold" />
            </Border>
        </Grid>
        <WindowsFormsHost x:Name="VideoSourceWindowsFormsHost"
                          Margin="10"
                          Background="Transparent">
            <controls:VideoSourcePlayer x:Name="VideoSourcePlayer" />
        </WindowsFormsHost>
    </Grid>
</UserControl>
Step: In code behind of the user control - Create five dependency properties that will control the video preview's:
- Width (Video preview width)
- Height (Video preview height)
- VideoSourceId (USB moniker string - something like "@device:pnp:\?\usb#vid_098d&pid_0542&mi_02#7&65f95301&0&0057#{87e9643d-ab56-11d0-a3b9-00a0c9223196}\global")
- SnapshotBitmap (Bitmap instance of currently rendering frame from USB camera)
- TakeSnapshot (implementation for ICommand to take snapshot from currently rendering frame)
Also contains implementation for callback on value changed for this dependency properties.
Step: Following code snippet will provide list of device (video input device only) attached to the machine (via USB).
public static IEnumerable<MediaInformation> GetVideoDevices
{
    get
    {
        var filterVideoDeviceCollection = new FilterInfoCollection(FilterCategory.VideoInputDevice);
        return (from FilterInfo filterInfo in filterVideoDeviceCollection select new MediaInformation { DisplayName = filterInfo.Name, UsbId = filterInfo.MonikerString }).ToList();
    }
}
Step: Import "AttachedCommandBehavior" into your project. I have adapted the same into the sample reffereed at the end of this post. This is proposed in one of the blog post of MARLONGRECH here.
Why should you use it, you ask?
It is not a mandatory thing, if you wish to tweak the implementation. But the way I made it work. I was in need to attach more than one command binding to the button where - when the user clicks on "Take snapshot" button, first command will grab the currently rendered SnapshotBitmap instance from preview and second command will take than instance and display into a Image control on screen.
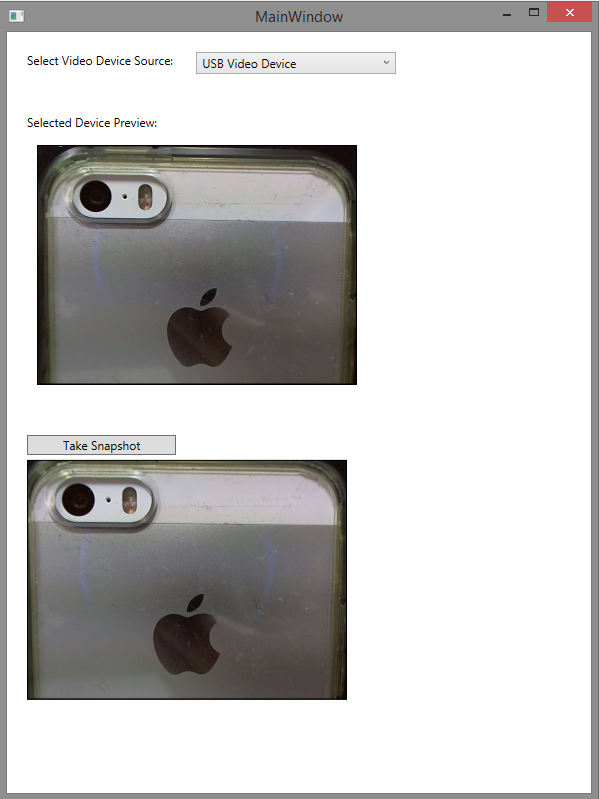
Step: Go ahead and create your UI where you can add a ComboBox to display list of attached video devices. On select one - the preview control can start rendering the live preview from the selected video source. On click of "Take snapshot" button it would take a snap and display in a Image control.
This code snippet demonstrates use of AttachedCommandBehavior in the MainWindow.xaml of the sample:
<TextBlock Grid.Column="0"
            Grid.Row="0"
            Text="Select Video Device Source: "
            Margin="20" />
<ComboBox Grid.Column="1"
            Grid.Row="0"
            ItemsSource="{Binding MediaDeviceList}"
            DisplayMemberPath="DisplayName"
            SelectedValuePath="UsbString"
            SelectedItem="{Binding SelectedVideoDevice}"
            Width="200"
            HorizontalAlignment="Left"
            VerticalAlignment="Center"
            Margin="0,20,20,20" />
<TextBlock Grid.Column="0"
            Grid.Row="1"
            Text="Selected Device Preview:"
            Margin="20,20,20,5" />
<video:WebcamDevice Grid.Row="2"
                    HorizontalAlignment="Left"
                    VerticalAlignment="Top"
                    Grid.Column="0"
                    Grid.ColumnSpan="2"
                    Margin="20,0,20,20"
                    x:Name="CameraVideoDeviceControl"
                    VideoPreviewWidth="{Binding VideoPreviewWidth}"
                    VideoPreviewHeight="{Binding VideoPreviewHeight}"
                    VideoSourceId="{Binding SelectedVideoDevice, Converter={StaticResource MediaInformationConverter}}"
                    SnapshotBitmap="{Binding SnapshotBitmap, Mode=TwoWay}" />
<Button Grid.Row="3"
        Margin="20,20,20,5"
        Grid.Column="0"
        Content="Take Snapshot">
    <cmdBehavior:CommandBehaviorCollection.Behaviors>
        <cmdBehavior:BehaviorBinding Event="Click"
                                        Command="{Binding TakeSnapshot, ElementName=CameraVideoDeviceControl}" />
        <cmdBehavior:BehaviorBinding Event="Click"
                                        Command="{Binding SnapshotCommand}" />
    </cmdBehavior:CommandBehaviorCollection.Behaviors>
</Button>
    <Image Source="{Binding SnapshotTaken}"
            HorizontalAlignment="Left"
            Grid.Row="4"
            Grid.Column="0"
            Grid.ColumnSpan="2"
            VerticalAlignment="Top"
            Width="320"
            Height="240"
            Margin="20,0,20,20" />
Screenshot of the sample while running:
Above narrated / demonstrated sample can be cloned / forked @ Github.
Update 26th Jan 2015:
I feel glad that what I share is actually helpful to my fellow developers and come back with question / queries or request for further changes - enhancments.
In above code and the source code @ Github - has the User control WebcamDevice using custom dependency property for setting the Width and Height of the Video device preview. This initially only accepted integer values and no Auto as value to inherit Width and Height of its parent control.
Chris Ni came up with this query / request to allow Auto for those dependency properties VideoPreviewWidth and VideoPreviewHeight. So I made further modification to support the same.
For assigning Auto as value to work i added following on the dependency property's getter / setter property:
[TypeConverter(typeof(LengthConverter))]
LengthConverter - TypeConverter does the trick. This didn't worked for the Height and Width set with type int so I changed it to double and also added few checks in the PropertyCoherceValueChanged event handler for Height and Width property and handle double.NaN - equivalent of Auto based on LengthConverter. The value for double.NaN is also handled while taking snapshot in TakeSnapshotCallback method and use ActualWidth and ActualHeight values when value is set as Auto.
Feel free to comeback with any issues / bugs you may encounter in code, happy to help :)
Happy Coding!!